POST
Android 如何上报 Touchevent 给应用层
上一篇博文 「ATMEL maXTouch IC驱动代码分析」 我们讲到了 Touch 驱动代码如何读取IC内部获取到的触摸事件信息并通过input_report_abs()和input_sync()函数上报给 Linux 的 Input 子系统的过程。今天这篇文章我们就走进 Input 子系统内部来看一下事件是如何被传递到 Android 的用户空间的。
内容如下。
目录
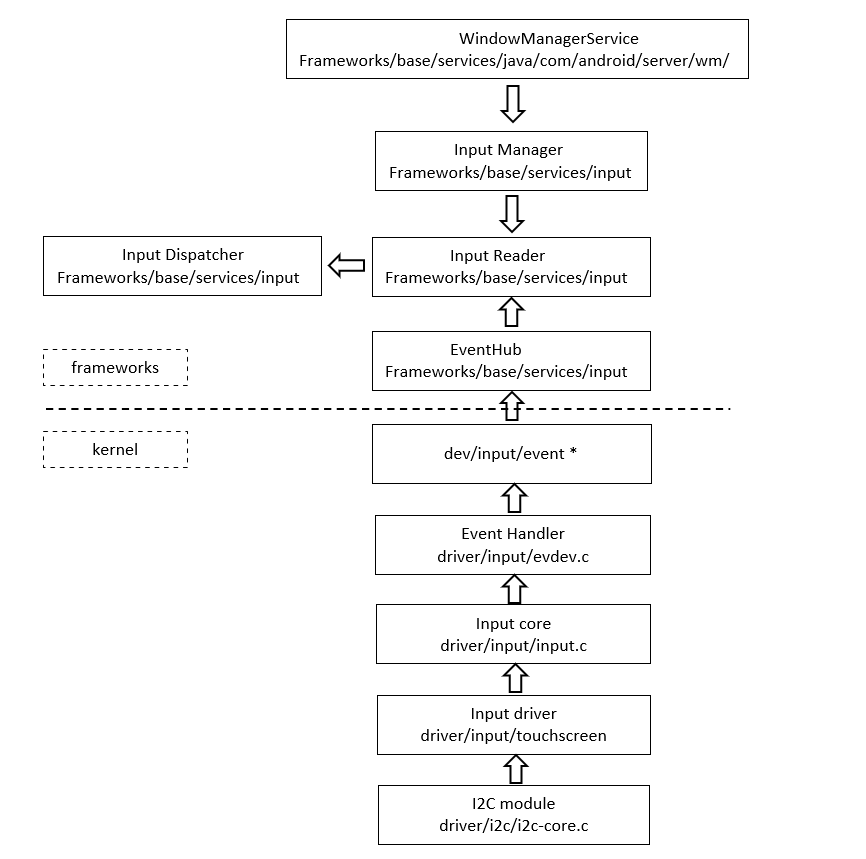
1. Input 子系统框架
首先我们从 Input 子系统介绍开始。Input 子系统由驱动层、输入子系统核心层(Input Core)和事件处理层(Event Handler)3部分组成。一个输入事件,如鼠标移动,触摸事件等通过驱动层->系统核心层->事件处理层->用户空间的顺序到达用户空间并传给应用程序使用。其中Input Core即输入子系统核心层由 driver/input/input.c 及相关头文件实现。其对下提供了设备驱动的接口,对上提供了事件处理层的编程接口。输入子系统主要设计input_dev、input_handler、input_handle等数据结构,它们的用途和功能如下图所示。

2. 注册 Input 设备
我们在之前介绍驱动代码的时候讲到过,输入设备在初始化的时候都需要调用input_allocate_device()和input_register_device()进行注册。其中input_allocate_device()函数在内存中为输入设备结构体分配一个空间,并对其主要的成员进行了初始化。它的代码如下。
struct input_dev *input_allocate_device(void)
{
 struct input_dev *dev;
 dev = kzalloc(sizeof(struct input_dev), GFP_KERNEL);
/*分配一个input_dev结构体,并初始化为0*/
 if (dev) {
 	dev->dev.type = &input_dev_type; 	/*初始化设备的类型*/
	dev->dev.class = &input_class; 		/*设置为输入设备类*/
 	device_initialize(&dev->dev); 		/*初始化device结构*/
 	mutex_init(&dev->mutex); 			/*初始化互斥锁*/
 	spin_lock_init(&dev->event_lock); 	/*初始化事件自旋锁*/
 	INIT_LIST_HEAD(&dev->h_list); 		/*初始化链表*/
 	INIT_LIST_HEAD(&dev->node); 		/*初始化链表*/
 	__module_get(THIS_MODULE); 			/*模块引用加1*/
 }
 return dev;
}该函数返回一个指向input_dev类型的指针,该结构体是一个输入设备结构体,包含了输入设备的一些相关信息,如设备支持的按键码、设备的名称、设备支持的事件等。
接下来调用的input_register_device()函数很重要,我们看一下它的具体实现。
int input_register_device(struct input_dev *dev)
{
	static atomic_t input_no = ATOMIC_INIT(0);
	struct input_handler *handler;
	const char *path;
	int error;
	__set_bit(EV_SYN, dev->evbit);
	init_timer(&dev->timer);
	if (!dev->rep[REP_DELAY] && !dev->rep[REP_PERIOD]) {
		dev->timer.data = (long) dev;
		dev->timer.function = input_repeat_key;
		dev->rep[REP_DELAY] = 250;
		dev->rep[REP_PERIOD] = 33;
	}
	if (!dev->getkeycode)
		dev->getkeycode = input_default_getkeycode;
	if (!dev->setkeycode)
		dev->setkeycode = input_default_setkeycode;
	dev_set_name(&dev->dev, "input%ld", (unsigned long) atomic_inc_return(&input_no) - 1);
	error = device_add(&dev->dev);
	if (error)
		return error;
	path = kobject_get_path(&dev->dev.kobj, GFP_KERNEL);
	printk(KERN_INFO "input: %s as %s\n", dev->name ? dev->name : "Unspecified device", path ? path : "NA");
	kfree(path);
	error = mutex_lock_interruptible(&input_mutex);
	if (error) {
		device_del(&dev->dev);
		return error;
	}
	list_add_tail(&dev->node, &input_dev_list);
	list_for_each_entry(handler, &input_handler_list, node)
	input_attach_handler(dev, handler);
	input_wakeup_procfs_readers();
	mutex_unlock(&input_mutex);
	return 0;
}input_register_device()函数是输入子系统核心(input core)提供的函数。该函数将input_dev结构体注册到输入子系统核心中,input_dev结构体必须由前面讲的 input_allocate_device()函数来分配。input_register_device()函数如果注册失败,必须调用 input_free_device() 函数释放分配的空间。如果该函数注册成功,在卸载函数中应该调用 input_unregister_device() 函数来注销输入设备结构体。
input_register_device()函数主要完成了如下的工作:
- 函数中调用
__set_bit()函数设置input_dev所支持的事件类型。事件类型由input_dev的evbit成员来表示,在这里将其EV_SYN置位,表示设备支持所有的事件。注意,一个设备可以支持一种或者多种事件类型。常用的事件类型如下:
#define EV_SYN 0x00 /*表示设备支持所有的事件*/
#define EV_KEY 0x01 /*键盘或者按键,表示一个键码*/
#define EV_REL 0x02 /*鼠标设备,表示一个相对的光标位置结果*/
#define EV_ABS 0x03 /*手写板产生的值,其是一个绝对整数值*/
#define EV_MSC 0x04 /*其他类型*/
#define EV_LED 0x11 /*LED灯设备*/
#define EV_SND 0x12 /*蜂鸣器,输入声音*/
#define EV_REP 0x14 /*允许重复按键类型*/
#define EV_PWR 0x16 /*电源管理事件*/- 调用
dev_set_name()设置input_dev中的device的名字,名字以input0、input1、input2、input3、input4等的形式出现在sysfs文件系统中。 - 使用
device_add()函数将input_dev包含的device结构注册到Linux设备模型中,并可以在sysfs文件系统中表现出来。 - 调用
list_add_tail()函数将input_dev加入input_dev_list链表中,input_dev_list链表中包含了系统中所有的input_dev设备。 - 调用了
input_attach_handler()函数,input_attach_handler()函数用来匹配input_dev和input_handler,只有匹配成功,才能进行下一步的关联操作。
input_attach_handler()函数的代码如下:
static int input_attach_handler(struct input_dev *dev, struct input_handler *handler)
{
	const struct input_device_id *id; /*输入设备的指针*/
	int error;
	if (handler->blacklist && input_match_device(handler->blacklist, dev))
		return -ENODEV; /*设备和处理函数之间的匹配*/
	id = input_match_device(handler->id_table, dev);
	if (!id)
		return -ENODEV;
	error = handler->connect(handler, dev, id);/*连接设备和处理函数*/
	if (error && error != -ENODEV)
		printk(KERN_ERR, "input: failed to attach handler %s to device %s,"error: %d\n",
			handler->name, kobject_name(&dev->dev.kobj), error);
	return error;
}input_attach_handler()主要完成的工作有:
- 首先判断
handle的blacklist是否被赋值,如果被赋值,则匹配blacklist中的数据跟dev->id的数据是否匹配。blacklist是一个input_device_id*的类型,其指向input_device_ids的一个表,这个表中存放了驱动程序应该忽略的设备。即使在id_table中找到支持的项,也应该忽略这种设备。 - 调用
input_match_device()函数匹配handle->id_table和dev->id中的数据。如果不成功则返回。handle->id_table也是一个input_device_id类型的指针,其表示驱动支持的设备列表。 - 如果匹配成功,则调用
handler->connect()函数将handler与input_dev连接起来。
input_match_device()函数
input_match_device()函数用来与input_dev和handler进行匹配。handler的id_table表中定义了其支持的input_dev设备。
该函数的代码如下:
static const struct input_device_id *input_match_device(const struct
input_device_id *id,
struct input_dev *dev)
{
	int i;
	for (; id->flags || id->driver_info; id++) {
		if (id->flags & INPUT_DEVICE_ID_MATCH_BUS)
			if (id->bustype != dev->id.bustype)
				continue;
		if (id->flags & INPUT_DEVICE_ID_MATCH_VENDOR)
			if (id->vendor != dev->id.vendor)
				continue;
		if (id->flags & INPUT_DEVICE_ID_MATCH_PRODUCT)
			if (id->product != dev->id.product)
				continue;
		if (id->flags & INPUT_DEVICE_ID_MATCH_VERSION)
			if (id->version != dev->id.version)
				continue;
		MATCH_BIT(evbit, EV_MAX);
		MATCH_BIT(keybit, KEY_MAX);
		MATCH_BIT(relbit, REL_MAX);
		MATCH_BIT(absbit, ABS_MAX);
		MATCH_BIT(mscbit, MSC_MAX);
		MATCH_BIT(ledbit, LED_MAX);
		MATCH_BIT(sndbit, SND_MAX);
		MATCH_BIT(ffbit, FF_MAX);
		MATCH_BIT(swbit, SW_MAX);
		return id;
	}
	return NULL;
}input_match_device()主要完成的工作有:
- 匹配设备的产品总线类型/vendor/版本信息。
- 如果
id->flags定义的类型匹配成功,或者id->flags没有定义,才会进入到MATCH_BIT的匹配项。MATCH_BIT宏的定义如下:
#define MATCH_BIT(bit, max) \
for (i = 0; i < BITS_TO_LONGS(max); i++) \
if ((id->bit[i] & dev->bit[i]) != id->bit[i]) \
break; \
if (i != BITS_TO_LONGS(max)) \
continue;从MATCH_BIT宏的定义可以看出。只有当iput device和input handler的ID成员在evbit、keybit、… swbit项相同才会匹配成功。
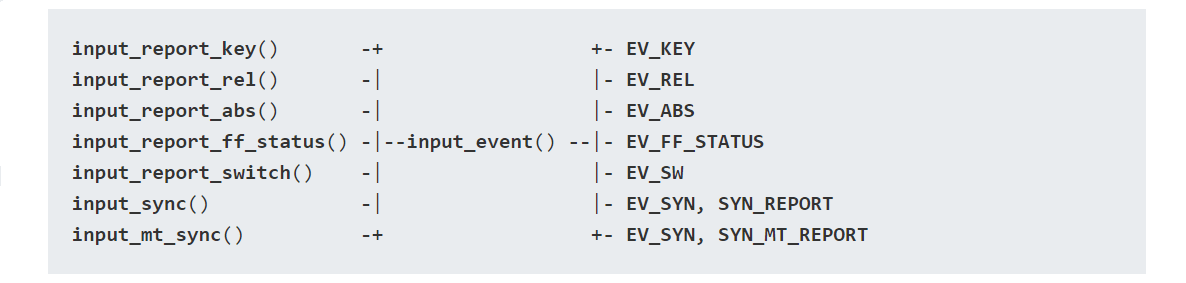
3. 数据上报过程
Input 子系统各层之间通信的基本单位就是事件,任何一个输入设备的动作都可以抽像成一种事件,如键盘的按下,触摸屏的按下,鼠标的移动等。事件有三种属性:类型(type),编码(code),值(value),Input子系统支持的所有事件都定义在input.h中,包括所有支持的类型,所属类型支持的编码等。事件传送的方向是硬件驱动层–>子系统核心–>事件处理层–>用户空间。
在驱动代码的介绍中,我们讲到驱动最终调用到input_report_abs()将touchevent打包发送给Input子系统。
input_report_abs()函数代码如下:
static inline void input_report_abs(struct input_dev *dev, unsigned int code, int value)
{
    input_event(dev, EV_ABS, code, value);
}
可以看到其为内联函数, 为input_event(,EV_ABS, ...)的二次封装。
input_event()的代码如下,略过无关的部分:
void input_event(struct input_dev *dev,unsigned int type, unsigned int code, int value)
{
	....//event是否支持, 这个和驱动里probe()时填充能力,设置参数有关,略过
    if (is_event_supported(type, dev->evbit, EV_MAX)) {
	....
        input_handle_event(dev, type, code, value);
	...
}
input_event() 调用了input_handle_event()函数。
static void input_handle_event(struct input_dev *dev, unsigned int type, unsigned int code, int value)
{
    int disposition = input_get_disposition(dev, type, code, &value); //得到disposition
......
    if (disposition & INPUT_FLUSH) {
        if (dev->num_vals >= 2)
            input_pass_values(dev, dev->vals, dev->num_vals);
        dev->num_vals = 0;
    } else if (dev->num_vals >= dev->max_vals - 2) {
        dev->vals[dev->num_vals++] = input_value_sync;
        input_pass_values(dev, dev->vals, dev->num_vals);  //**<--> 重点,
        dev->num_vals = 0;
    }

}所以我们可以简单看下input_handle_event() –> input_get_disposition() EV_SYN事件和EV_ABS的返回值。
static int input_get_disposition(struct input_dev *dev, unsigned int type, unsigned int code, int *pval)
{
    int disposition = INPUT_IGNORE_EVENT;
	......
    switch (type) {

    case EV_SYN:
        switch (code) {
        case SYN_CONFIG:
            disposition = INPUT_PASS_TO_ALL;
            break;

        case SYN_REPORT:
            disposition = INPUT_PASS_TO_HANDLERS | INPUT_FLUSH;
            break;
        case SYN_MT_REPORT:
            disposition = INPUT_PASS_TO_HANDLERS;
            break;
        }
        break;
	......
    case EV_ABS:
        if (is_event_supported(code, dev->absbit, ABS_MAX))
            disposition = input_handle_abs_event(dev, code, &value);//这个可以看看,他会对相同值进行过滤,返回INPUT_IGNORE_EVENT

        break;
	......
    return disposition;
}让我们回到input_handle_event() –> input_pass_values()
static void input_pass_values(struct input_dev *dev, struct input_value *vals, unsigned int count)
{
	......
    if (handle) {
        count = input_to_handler(handle, vals, count);
    } else {
        list_for_each_entry_rcu(handle, &dev->h_list, d_node)
            if (handle->open) {
                count = input_to_handler(handle, vals, count);
                if (!count)
                    break;
            }
    }
	......
}其重点函数为input_to_handler()
static unsigned int input_to_handler(struct input_handle *handle,
            struct input_value *vals, unsigned int count)
{
    struct input_handler *handler = handle->handler;
	......
    if (handler->filter) {
        for (v = vals; v != vals + count; v++) {
            if (handler->filter(handle, v->type, v->code, v->value))
                continue;
	.......
    }
	......
    if (handler->events)
        handler->events(handle, vals, count); //<--handler的events.
    else if (handler->event)
        for (v = vals; v != vals + count; v++)
            handler->event(handle, v->type, v->code, v->value);

    return count;
}这里面input_handle结构体代表一个成功配对的input_dev和input_handler。
关于input_handle,input_dev和input_handler结构体的含义如下:
struct input_dev: 物理输入设备的基本数据结构,包含设备相关的一些信息。struct input_handler: 事件处理结构体,定义怎么处理事件的逻辑。struct input_handle: 用来创建input_dev和input_handler之间关系的结构体。
3.1 input_handler
input_handler结构体的定义如下:
struct input_handler {

    void *private;

    void (*event)(struct input_handle *handle, unsigned int type, unsigned int code, int value);
    void (*events)(struct input_handle *handle,
               const struct input_value *vals, unsigned int count);
    bool (*filter)(struct input_handle *handle, unsigned int type, unsigned int code, int value);
    bool (*match)(struct input_handler *handler, struct input_dev *dev);
    int (*connect)(struct input_handler *handler, struct input_dev *dev, const struct input_device_id *id);
    void (*disconnect)(struct input_handle *handle);
    void (*start)(struct input_handle *handle);
......
    const char *name;

    const struct input_device_id *id_table;

    struct list_head    h_list;
    struct list_head    node;
};
该结构体主要是
- 定义了一个
event()处理函数,这个函数将被输入子系统调用去处理发送给设备的事件。例如将发送一个事件命令LED灯点亮,实际控制硬件的点亮操作就可以放在event()函数中实现。 - 定义了一个
connect()函数,该函数用来连接handler和input_dev。 - 定义了一个
disconnect()函数,这个函数用来断开handler和input_dev之间的联系。 - 定义了一个name,表示handler的名字,显示在
/proc/bus/input/handlers目录中。 - 定义了一个
id_table表,表示驱动能够处理的表。 - 指向一个
input_device_id表,这个表包含handler应该忽略的设备。 - 定义了一个链表h_list,表示与这个
input_handler相联系的下一个handler。 - 定义了一个链表node,将其连接到全局的
input_handler_list链表中,所有的input_handler都连接在其上。
3.2 注册 input_handler
input_register_handler()函数注册一个新的input handler处理器。这个handler将为输入设备使用,一个handler可以添加到多个支持它的设备中,也就是一个handler可以处理多个输入设备的事件。函数的参数传入简要注册的input_handler指针,该函数的代码如下:
int input_register_handler(struct input_handler *handler)
{
......//初始化h_list
    INIT_LIST_HEAD(&handler->h_list);
    //将node加到list尾部
    list_add_tail(&handler->node, &input_handler_list);
    //在注册handler的时候也对已有设备调用一次attach()
    list_for_each_entry(dev, &input_dev_list, node)
        input_attach_handler(dev, handler);
......
}
完成的主要工作:
- 调用
list_add_tail()函数,将handler加入全局的input_handler_list链表中,该链表包含了系统中所有的input_handler。 - 调用了
input_attach_handler()函数。input_attach_handler()函数的作用是匹配input_dev_list链表中的input_dev与handler。如果成功会将input_dev与handler联系起来。
3.3 input_handle
Input_Handle 结构体
input_register_handle()函数用来注册一个新的handle到输入子系统中。input_handle的主要功能是用来连接input_dev和input_handler。
struct input_handle {
	void *private;
	int open;
	const char *name;
	struct input_dev *dev;
	struct input_handler *handler;
	struct list_head d_node;
	struct list_head h_node;
};
3.4 注册 input_handle
input_handle是用来连接input_dev和input_handler的一个中间结构体。事件通过input_handle从 input_dev 发送到input_handler,或者从input_handler发送到input_dev进行处理。在使用input_handle之前,需要对其进行注册,注册函数是input_register_handle()。
input_register_handle()函数用来注册一个新的handle到输入子系统中。该函数接收一个input_handle类型的指针,该变量要在注册前对其成员初始化。
input_register_handle()函数的代码如下:
int input_register_handle(struct input_handle *handle)
{
	struct input_handler *handlehandler = handle->handler;
	struct input_dev *dev = handle->dev;
	int error;
	error = mutex_lock_interruptible(&dev->mutex);
	if (error)
		return error;
	list_add_tail_rcu(&handle->d_node, &dev->h_list);
	mutex_unlock(&dev->mutex);
	synchronize_rcu();
	list_add_tail(&handle->h_node, &handler->h_list);
	if (handler->start)
		handler->start(handle);
	return 0;
}- 调用
list_add_tail_rcu()函数将handle加入输入设备的dev->h_list链表中。 - 调用
list_add_tail()函数将handle加入input_handler的handler->h_list链表中。
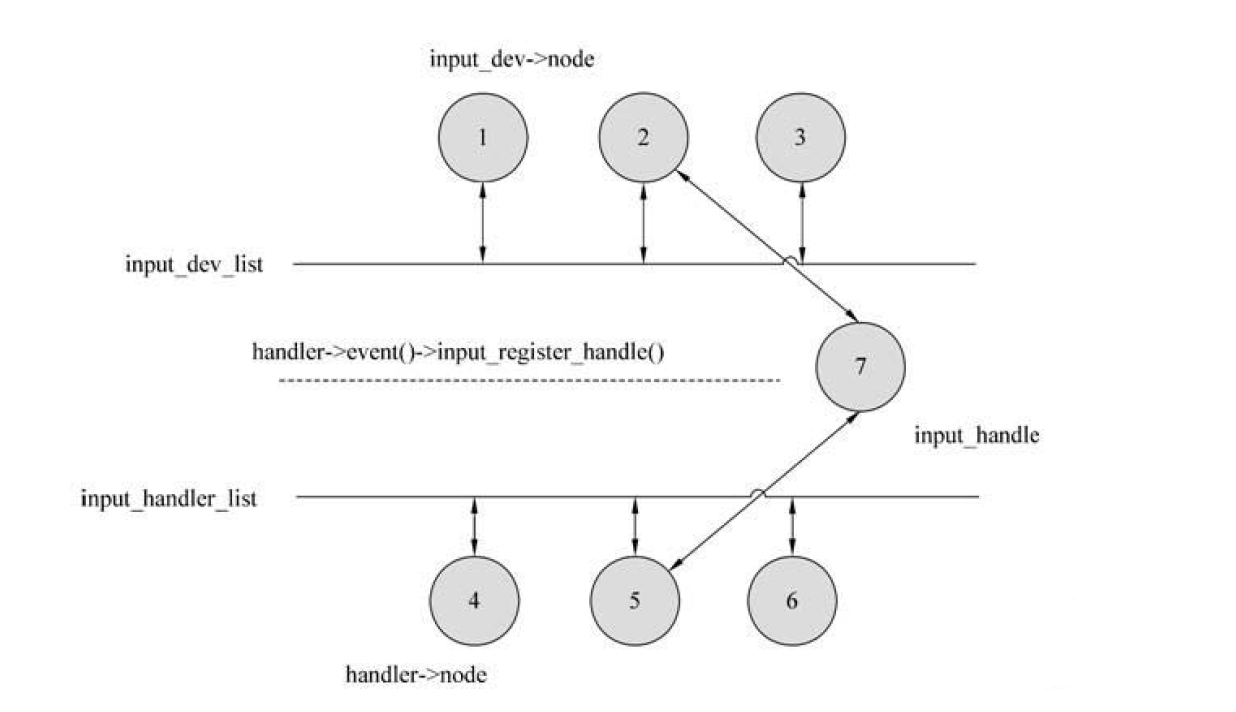
input_dev、input_handler和handle三者之间的关系如下:
- input_dev 是硬件驱动层,代表一个input设备;
- input_handler 是事件处理层,代表一个事件处理器;
- input_handle 个人认为属于核心层,代表一个配对的input设备与input事件处理器;
- input_dev 通过全局的
input_dev_list链接在一起。设备注册的时候实现这个操作; - input_handler 通过全局的
input_handler_list链接在一起。事件处理器注册的时候实现这个操作(事件处理器一般内核自带,一般不需要我们来写); - input_hande 没有一个全局的链表,它注册的时候将自己分别挂在了input_dev 和input_handler 的h_list上了。通过input_dev 和input_handler就可以找到input_handle 在设备注册和事件处理器,注册的时候都要进行配对工作,配对后就会实现链接。通过input_handle也可以找到input_dev和input_handler。
3.5 由核心层 (inputcore) 到事件处理层 (eventhandler)
我们看到上面的代码调用到
handler->events(handle, v->type, v->code, v->value);这里handler->events则是Evdev.c(drivers\input)里定义的。
events 函数是当事件处理器接收到了来自input设备传来的事件时调用的处理函数,负责处理事件。
static struct input_handler evdev_handler = {

	.event = evdev_event,
	.events = evdev_events,
	...
}
我们看一下函数原型。
static void evdev_events(struct input_handle *handle,
             const struct input_value *vals, unsigned int count)
{
......
    if (client)
        evdev_pass_values(client, vals, count, ev_time);
    else
        list_for_each_entry_rcu(client, &evdev->client_list, node)
            evdev_pass_values(client, vals, count, ev_time);
......
}
事件处理层(eventhandler)负责将事件上报,将键值、坐标等数据上报的对应的设备节点.
static void evdev_pass_values(struct evdev_client *client,
            const struct input_value *vals, unsigned int count,
            ktime_t *ev_time)
{
    struct evdev *evdev = client->evdev;
    const struct input_value *v;
    struct input_event event;
    struct timespec64 ts;
......//时间
    event.input_event_sec = ts.tv_sec;
    event.input_event_usec = ts.tv_nsec / NSEC_PER_USEC;
......
    for (v = vals; v != vals + count; v++) {
......//事件数据填充
        event.type = v->type;
        event.code = v->code;
        event.value = v->value;
        __pass_event(client, &event); //<--放到client->buffer里
    }
......
}
3.6 由事件处理层 (eventhandler) 到用户空间(user space)
__pass_event()将event放到client->buffer[]里,由buffer 传入用户空间。
__pass_event() 函数最终将事件传递给了用户端的client 结构中的input_event 数组中,只需将这个input_event数组复制给用户空间,进程就能收到触摸屏按下的信息了。
static void __pass_event(struct evdev_client *client,
             const struct input_event *event)
{
    client->buffer[client->head++] = *event;
    client->head &= client->bufsize - 1;

    if (unlikely(client->head == client->tail)) {
        /*
         * This effectively "drops" all unconsumed events, leaving
         * EV_SYN/SYN_DROPPED plus the newest event in the queue.
         */
        client->tail = (client->head - 2) & (client->bufsize - 1);

        client->buffer[client->tail].input_event_sec =
                        event->input_event_sec;
        client->buffer[client->tail].input_event_usec =
                        event->input_event_usec;
        client->buffer[client->tail].type = EV_SYN;
        client->buffer[client->tail].code = SYN_DROPPED;
        client->buffer[client->tail].value = 0;

        client->packet_head = client->tail;
    }

    if (event->type == EV_SYN && event->code == SYN_REPORT) {
        client->packet_head = client->head;
        kill_fasync(&client->fasync, SIGIO, POLL_IN);
    }
}
input_event 结构体:
struct input_event
{
	struct timeval time;
	__u16 type;
	__u16 code;
	__s32 value;
}
3.7 用户空间读取事件
我们从上面分析,看到数据已经放到了client->buffer[], 那读取也肯定也是从这里读。实际上,在文件evdev.c 中Evdev_read()函数将这个input_event数组复制给用户空间。
static ssize_t evdev_read(struct file *file, char __user *buffer,
              size_t count, loff_t *ppos)
{
    struct evdev_client *client = file->private_data;
    struct evdev *evdev = client->evdev;
......
    for (;;) {
......//循环读取下一个事件, 并通过input_event_to_user() --> copy_to_user()给用户空间, 这样上面就读到数据了.
        while (read + input_event_size() <= count &&
               evdev_fetch_next_event(client, &event)) {

            if (input_event_to_user(buffer + read, &event))
......
    return read;
}调用了input_event_to_user()函数
int input_event_to_user(char __user *buffer, const struct input_event * event){

	if(copy_to_user(buffer,event,sizeof(struct input_event)))
		return -EFAULT;

	return 0;
}
事件读取函数调用流程
read时候 evdev_read--> 从client->buffer[]循环获取事件 evdev_fetch_next_event() --> input_event_to_user() --> copy_to_user()4. 总结
最后总结一下整个数据的走向和传送的流程。
- 按照linux设备架构,驱动模型实现touchscreen driver。
- 模块初始化函数中将触摸屏注册到了输入子系统中,于此同时,注册函数在事件处理层链表中寻找事件处理器,这里找到的是evdev,并且将驱动与事件处理器挂载。并且在
/dev/input中生成设备文件event0,以后我们访问这个文件就会访问到设备数据。
当各个handler init时 --> input_register_handler() --> input_attach_handler() -->  handler->connect()
或者驱动 --> probe() --> input_register_device() --> input_attach_handler -->  handler->connect()

                                             +--> input_register_handle() dev和handler关联
handler->connect()-->  eg:evdev.c events() --+
+-->cdev_device_add() 注册字符设备- 当点击触屏后, 进到中断处理,然后读取数据,再report,并存到client的buffer[]里。
input_report_abs() --> input_event(, EV_ABS, , ) --> input_handle_event() --> input_pass_values() --> input_to_handler() -->
handler->events()/event() --> eg:evdev.c events() --> evdev_pass_values() --> 数据填充 --> __pass_event() --> client->buffer[]- 上层用户空调read时, 只要有数据,不断从client->buffer[]读取并通过
copy_to_user()拷到用户空间, 所以上层就拿到数据了。
read时候...--> evdev_read--> 从client->buffer[]循环获取事件 evdev_fetch_next_event() -->
input_event_to_user() --> copy_to_user()